Quick Start
In this tutorial, we'll walk through three simple steps to get started with Agenta:
- Create a prompt in the web UI
- Deploy it to an environment
- Integrate it with your codebase using the Agenta SDK
⏯️ Watch a video of the quick start guide.
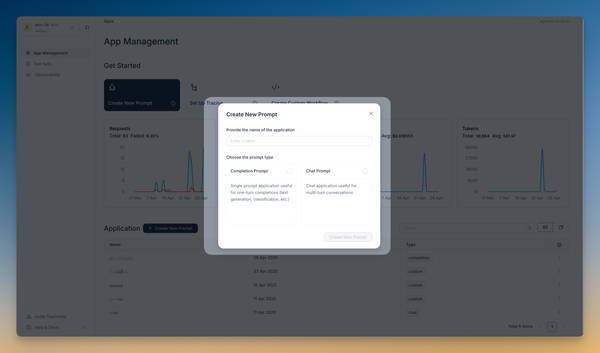
1. Create a prompt
Go to the app overview and click on Create a Prompt. You can choose between:
- Completion Prompt: For single-turn LLM applications (question answering, text generation, classification)
- Chat Application: For multi-turn applications like chatbots
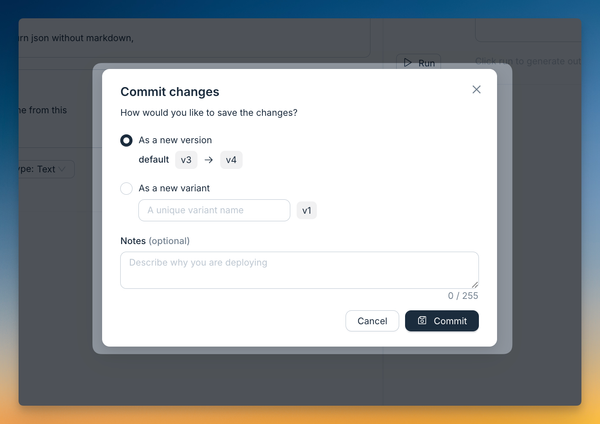
2. Commit your changes
After making changes to your prompt configuration:
- Click the Commit button
- Choose to commit to the default variant or create a new one
Variants are like Git branches, allowing you to experiment with different configurations. Each variant is versioned, with each version having its own commit number and being immutable.
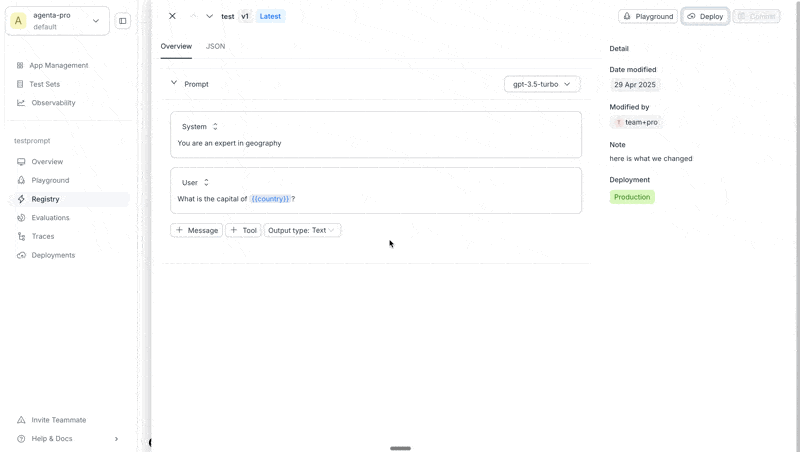
3. Deploy to an environment
When you're satisfied with your prompt:
- Navigate to the Registry page
- Select the revision you want to deploy
- Click the Deploy button
- Choose the environment (
production,development, orstaging) - Add optional deployment notes
You can deploy a variant from the Playground, the Registry, or from the Deployments page directly.
Most changes made while iterating on a variant are experimental and not immediately deployed to production. This separation allows you to experiment freely before pushing changes to live environments. Environments are versioned separately from variants, enabling rollbacks if needed.
4. Integrate with your code
Access your deployed prompt using either the Agenta Python SDK or the API directly.
- Using Python SDK
- Using API (JavaScript)
First, import and initialize the Agenta SDK:
import agenta as ag
# os.environ["AGENTA_API_KEY"] = "YOUR_AGENTA_API_KEY"
# os.environ["AGENTA_HOST"] = "https://cloud.agenta.ai" # only needed when self-hosting
ag.init()
Fetch your prompt configuration from the registry:
config = ag.ConfigManager.get_from_registry(
    app_slug="your-app-slug",
    environment_slug="production"
)
For asynchronous applications, use aget_from_registry instead.
The response is a JSON object containing your complete prompt configuration:
{
  "prompt": {
    "messages": [
      {
        "role": "system",
        "content": "You are an expert in geography"
      },
      {
        "role": "user",
        "content": "What is the capital of {{country}}? "
      }
    ],
    "input_keys": [
      "country"
    ],
    "llm_config": {
      "model": "gpt-3.5-turbo",
      "tools": [],
      "top_p": 0.2,
      "max_tokens": 257,
      "temperature": 0.2,
      "presence_penalty": -1.7,
      "frequency_penalty": -1.5,
      "response_format": {
        "type": "json_schema",
        "json_schema": {
          "name": "MySchema",
          "schema": {
            "type": "object",
            "properties": {}
          },
          "strict": false,
          "description": "A description of the schema"
        }
      }
    },
    "template_format": "curly"
  }
}
Use the helper class PromptTemplate to format your prompt and convert it to OpenAI-compatible parameters:
prompt = PromptTemplate(**config["prompt"]).format(country="France")
client = openai.OpenAI()
response = client.chat.completions.create(
    **prompt.to_openai_kwargs()
)
const fetchConfigs = async () => {
  const url = 'https://cloud.agenta.ai/api/variants/configs/fetch';

  const headers = {
    'Accept': 'application/json',
    'Authorization': 'YOUR_API_KEY',
    'Content-Type': 'application/json'
  };

  const requestData = {
    environment_ref: {
      slug: 'production',
      id: null
    },
    application_ref: {
      slug: 'testprompt',
      id: null
    }
  };

  try {
    const response = await fetch(url, {
      method: 'POST',
      headers,
      body: JSON.stringify(requestData)
    });

    const data = await response.json();
    console.log('Response:', JSON.stringify(data, null, 2));

  } catch (error) {
    console.error('Error:', error);
  }
};

fetchConfigs();
The response will contain your prompt configuration under params.prompt:
{
  "params": {
      "prompt": {
        "messages": [
          {
            "role": "system",
            "content": "You are an expert in geography"
          },
          {
            "role": "user",
            "content": "What is the capital of {{country}}?"
          }
        ],
        "input_keys": ["country"],
        "llm_config": {
          "model": "gpt-3.5-turbo",
          "tools": []
        },
        "user_prompt": "What is the capital of {{country}}?",
        "system_prompt": "You are an expert in geography",
        "template_format": "curly"
      }
    }
  },
  "url": "https://cloud.agenta.ai/services/completion",
  "application_ref": {
    "slug": "we",
    "version": null,
    "commit_message": null,
    "id": "0196869b-2337-7d51-8a24-fc3893191b5b"
  },
  "service_ref": null,
  "variant_ref": {
    "slug": "key",
    "version": 1,
    "commit_message": "variant commit message",
    "id": "0196869b-259c-7e11-ba08-ac316a2d41fa"
  },
  "environment_ref": {
    "slug": "production",
    "version": 1,
    "commit_message": "test commit message",
    "id": "0196869c-bd67-7f41-b7bb-d1196f87d4e9"
  },
  "variant_lifecycle": {
    "created_at": "2025-04-30T12:10:36.828905+00:00",
    "updated_at": "2025-04-30T12:10:36.315388+00:00",
    "updated_by_id": "01966e0a-9094-7562-8d47-87002335e22b",
    "updated_by": "me@gmail.com"
  },
  "environment_lifecycle": {
    "created_at": "2025-04-30T12:12:21.223715+00:00",
    "updated_at": "2025-04-30T12:12:21.223715+00:00",
    "updated_by_id": "01966e0a-9094-7562-8d47-87002335e22b",
    "updated_by": "me@gmail.com"
  }
}
Model names follow LiteLLM naming conventions: provider/model (e.g., cohere/command-light), provider/type/model (e.g., openrouter/google/palm-2-chat-bison), or just model for OpenAI models (e.g., gpt-3.5-turbo). Custom models use the format your_custom_provider_name/adapter/model (e.g., my_bedrock/bedrock/llama-3.1-8b-instant).
For simpler observability and cost tracking, Agenta also offers an endpoint to directly call LLMs with your prompt configuration. Learn more in the proxy LLM calls section.
Next Steps
Congratulations! You've created a prompt, deployed it to an environment, and integrated it with your codebase.
To continue your journey with Agenta:
📄️ Explore the Prompt Management SDK
Learn advanced features of the prompt management SDK
📄️ Explore the Playground
Learn how to use the playground