Quick Start: Your First LLM Application
This guide walks you through creating, evaluating, and deploying your first LLM application using Agenta's user interface. In just a few minutes, you'll have a working prompt that you can use in production.
⏯️ Watch a short demo of the quick start guide.
What You'll Learn
By the end of this tutorial, you'll know how to:
- Create a new prompt and bootstrap a test set from interactions in the playground
- Run evaluations from the UI to measure the prompt performance
- Deploy prompts to production environments and integrate them with your applications
- Trace prompt interactions and usage
Step 1: Create Your First Prompt
Let's start by creating a simple prompt that returns the capital city of any country.
Creating the Application
- Click "Create New Prompt" on your dashboard
- Select "Completion Prompt" from the options
- Name your prompt "get_capital"
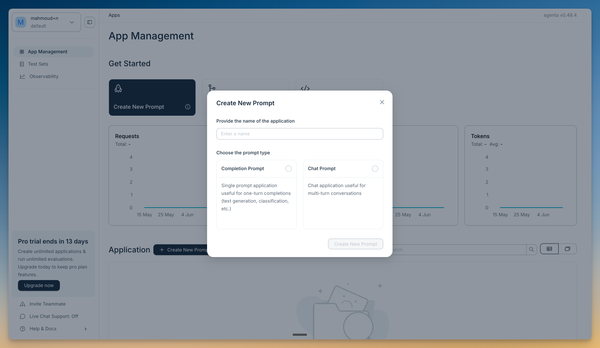
Agenta supports two main prompt types:
- Completion Prompts: Single-turn prompts for generating one response (like summaries, translations, or factual answers)
- Chat Prompts: Multi-turn prompts for conversations (like chatbots or interactive assistants)
For this tutorial, we're using a completion prompt since we want a single, direct answer.
Step 2: Test and Improve Your Prompt
Now let's experiment with the prompt in Agenta's playground to make sure it works correctly.
Initial Testing
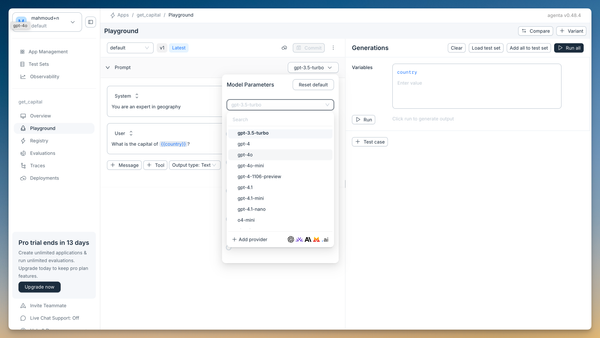
The template comes with a basic prompt for getting country capitals. Let's test it:
- Go to the playground (it should open automatically after creating your prompt)
- Enter "France" in the input field
- Click "Run" to test the prompt
- Check the result - it should return "The capital of France is Paris"
Refining the Prompt
The current response is a full sentence, but let's say we want just the city name. We can improve this:
-
Edit the prompt to be more specific:
What is the capital of {{country}}? Answer with only the capital name. -
Change the model to "gpt-4o-mini" for better performance:
- Run the prompt again with "France" as input
- Verify the result now shows just "Paris"
Saving Your Changes
Now let's save this improved version:
- Click the "Commit" button
- Select "As a new variant"
- Name the variant "explicit-prompt"

Variants in Agenta work like branches in Git repositories. Each variant is versioned. You can use variants to experiment with different concepts (e.g., long prompt and short prompt), different models (gpt-4o-mini and gpt-4o), or have different team members work (alex variant1, amani-var2).
Step 3: Create a Test Set
Test sets help you evaluate your prompts consistently. Let's create one using the data point we just tested.
Adding to a Test Set
You can create a test set directly from the playground:
- Click the three dots next to your output result
- Select "Add to test set"
- Configure the test set in the drawer that opens:
- Test set name: Create new and name it "capitals"
- Input mapping: Leave "country" mapped to "country"
- Output mapping: Leave "output" mapped to "correct_answer"
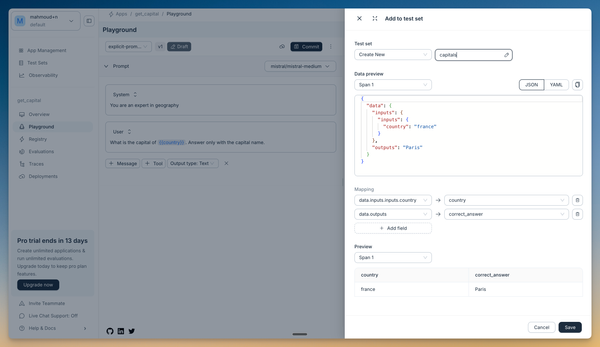
This creates a test case where:
- Input: France
- Expected output: Paris
You can add more countries to this test set later to ensure your prompt works consistently across different inputs.
Step 4: Evaluate Your Prompt
Evaluation helps you measure how well your prompt performs against your test cases.
Running an Evaluation
- Go to the Evaluation page from the main navigation
- Click "Start new evaluation"
- Configure your evaluation:
- Test set: Select "capitals" (the one we just created)
- Variant: Select "explicit-prompt"
- Evaluator: Select "Exact Match" (to check if output exactly matches expected result)
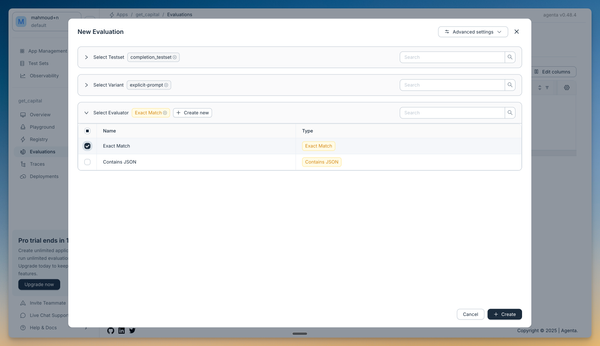
Agenta comes with a set of built-in evaluators that you can use to evaluate your prompt. You can also create your own custom evaluator using code or webhooks.
Analyzing the Results
The evaluation will run in the background. Once complete, you can:
- View overall results on the evaluation dashboard
- Click on the evaluation to see detailed results for each test case
- Identify any failures where the output didn't match expectations
This helps you understand how reliable your prompt is before deploying it to production.
Step 5: Deploy to Production
Once you're satisfied with your prompt's performance, it's time to deploy it.
Deploying Your Prompt
- Go to the Registry page to see all your prompt versions
- Find and select your "explicit-prompt" variant
- Click "Deploy" in the upper right corner of the drawer that opens
- Select "Production" as the target environment
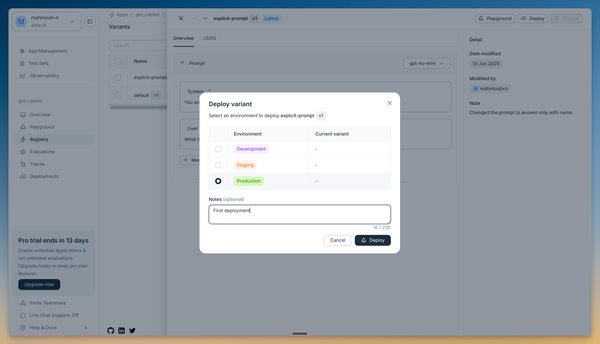
Your prompt is now live and ready to use in your applications!
Step 6: Integrate with Your App: Fetch the Prompt Configuration
Agenta provides two main ways to integrate with your application:
- Use Agenta for Prompt Management: Fetch the prompt configuration and use it in your own code
- Use Agenta as a Proxy: Use Agenta as a middleware that forwards requests to the LLM
In this guide, we'll use the first approach. The second approach is covered in the Integration Guide. Its advantages are simpler integration and getting observability out of the box. The disadvantages are that it does not support streaming responses and adds a slight latency to the response (approximately 0.3 seconds).
We are going to fetch the prompt configuration and use it in our own code:
- Using Python SDK
- Using API (JavaScript)
First, import and initialize the Agenta SDK:
import agenta as ag
# os.environ["AGENTA_API_KEY"] = "YOUR_AGENTA_API_KEY"
# os.environ["AGENTA_HOST"] = "https://cloud.agenta.ai" # only needed when self-hosting
ag.init()

# Fetch your prompt configuration from the registry
# You can also use `ag.ConfigManager.get_from_registry_async` for asynchronous applications
config = ag.ConfigManager.get_from_registry(
    app_slug="your-app-slug",
    environment_slug="production"
)

# Use the helper class `PromptTemplate` to format your prompt and convert it to OpenAI-compatible parameters
prompt = PromptTemplate(**config["prompt"]).format(country="France")
client = openai.OpenAI()
response = client.chat.completions.create(
    **prompt.to_openai_kwargs()
)
The JSON response with your prompt configuration.
{
  "prompt": {
    "messages": [
      {
        "role": "system",
        "content": "You are an expert in geography"
      },
      {
        "role": "user",
        "content": "What is the capital of {{country}}? "
      }
    ],
    "input_keys": [
      "country"
    ],
    "llm_config": {
      "model": "gpt-3.5-turbo",
      "tools": [],
      "top_p": 0.2,
      "max_tokens": 257,
      "temperature": 0.2,
      "presence_penalty": -1.7,
      "frequency_penalty": -1.5,
      "response_format": {
        "type": "json_schema",
        "json_schema": {
          "name": "MySchema",
          "schema": {
            "type": "object",
            "properties": {}
          },
          "strict": false,
          "description": "A description of the schema"
        }
      }
    },
    "template_format": "curly"
  }
}
const fetchConfigs = async () => {
  const url = 'https://cloud.agenta.ai/api/variants/configs/fetch';

  const headers = {
    'Accept': 'application/json',
    'Authorization': 'YOUR_API_KEY',
    'Content-Type': 'application/json'
  };

  const requestData = {
    environment_ref: {
      slug: 'production',
      id: null
    },
    application_ref: {
      slug: 'testprompt',
      id: null
    }
  };

  try {
    const response = await fetch(url, {
      method: 'POST',
      headers,
      body: JSON.stringify(requestData)
    });

    const data = await response.json();
    console.log('Response:', JSON.stringify(data, null, 2));

  } catch (error) {
    console.error('Error:', error);
  }
};

fetchConfigs();
The JSON response with your prompt configuration.
{
  "params": {
      "prompt": {
        "messages": [
          {
            "role": "system",
            "content": "You are an expert in geography"
          },
          {
            "role": "user",
            "content": "What is the capital of {{country}}?"
          }
        ],
        "input_keys": ["country"],
        "llm_config": {
          "model": "gpt-3.5-turbo",
          "tools": []
        },
        "user_prompt": "What is the capital of {{country}}?",
        "system_prompt": "You are an expert in geography",
        "template_format": "curly"
      }
    }
  },
  "url": "https://cloud.agenta.ai/services/completion",
  "application_ref": {
    "slug": "we",
    "version": null,
    "commit_message": null,
    "id": "0196869b-2337-7d51-8a24-fc3893191b5b"
  },
  "service_ref": null,
  "variant_ref": {
    "slug": "key",
    "version": 1,
    "commit_message": "variant commit message",
    "id": "0196869b-259c-7e11-ba08-ac316a2d41fa"
  },
  "environment_ref": {
    "slug": "production",
    "version": 1,
    "commit_message": "test commit message",
    "id": "0196869c-bd67-7f41-b7bb-d1196f87d4e9"
  },
  "variant_lifecycle": {
    "created_at": "2025-04-30T12:10:36.828905+00:00",
    "updated_at": "2025-04-30T12:10:36.315388+00:00",
    "updated_by_id": "01966e0a-9094-7562-8d47-87002335e22b",
    "updated_by": "me@gmail.com"
  },
  "environment_lifecycle": {
    "created_at": "2025-04-30T12:12:21.223715+00:00",
    "updated_at": "2025-04-30T12:12:21.223715+00:00",
    "updated_by_id": "01966e0a-9094-7562-8d47-87002335e22b",
    "updated_by": "me@gmail.com"
  }
}
Step 7: Integrating with Your Application: Adding Observability
Agenta is built on top of OpenTelemetry and is compatible with a number of semantic conventions in the ecosystem (OpenLLMetry, OpenInference, Logfire). It comes therefore with built-in auto-instrumentation support for all major LLM frameworks and SDKs such as OpenAI, LiteLLM, LangChain.
To add instrumentation to our application, let's use the auto-instrumentation support for OpenAI. We are going to use the OpenLLMetry library to auto-instrument the OpenAI client.
First, we need to install the OpenLLMetry library:
pip install opentelemetry-instrumentation-openai
Then we can add auto-instrumentation to our application (new lines are highlighted):
import agenta as ag
from opentelemetry.instrumentation.openai import OpenAIInstrumentor

import openai

# os.environ["AGENTA_API_KEY"] = "YOUR_AGENTA_API_KEY"
# os.environ["AGENTA_HOST"] = "https://cloud.agenta.ai" # only needed when self-hosting
ag.init()

OpenAIInstrumentor().instrument()

# Fetch your prompt configuration from the registry
# You can also use `ag.ConfigManager.get_from_registry_async` for asynchronous applications
config = ag.ConfigManager.get_from_registry(
    app_slug="your-app-slug",
    environment_slug="production"
)

# Use the helper class `PromptTemplate` to format your prompt and convert it to OpenAI-compatible parameters
prompt = PromptTemplate(**config["prompt"]).format(country="France")
client = openai.OpenAI()
response = client.chat.completions.create(
    **prompt.to_openai_kwargs()
)
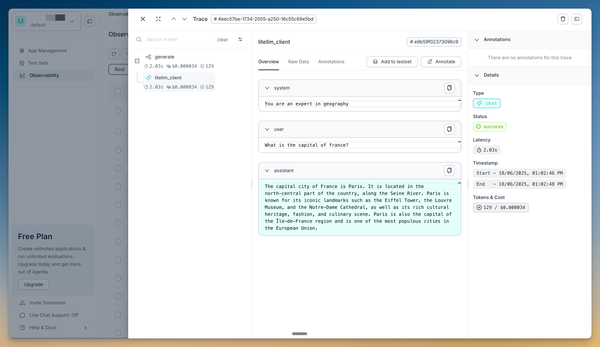
You can go now the the observability page and see the trace generated. It includes the cost, latency, and inputs/outputs of the prompt.
What's Next?
Congratulations! You've successfully created, tested, deployed, and set up observability for your first LLM application.
Here are some next steps to explore:
- Set up your evaluation workflow
- Set up observability and explore the different integrations
- Set up custom workflows to enable product teams to run evaluations on complex applications from the UI