Create Test Sets
This guide outlines the various methods for creating test sets in Agenta and provides specifications for the test set schema.
Test sets are one of the most critical components for building reliable LLM-powered applications. They allow you to evaluate your application, find edge cases, prevent regressions, and systematically improve performance over time.
What is a Test Set?
A test set is a collection of test cases, each containing:
- Inputs: The data your LLM application expects (required)
- Ground Truth: The expected answer from your application (optional, often stored as "correct_answer")
- Annotations: Additional metadata or rules about the test case (optional)
You can create a test set in Agenta using the following methods:
- By uploading a CSV or JSON file
- Using the API
- Using the UI
- From the playground
- From traces in observability
Creating a Test Set from a CSV or JSON
To create a test set from a CSV or JSON file:
- Go to
Test sets - Click
Upload test sets - Select either
CSVorJSON
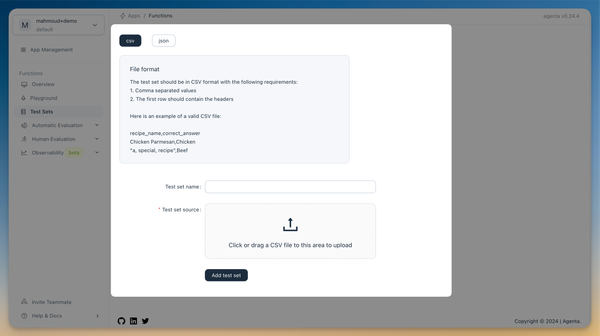
CSV Format
We use CSV with commas (,) as separators and double quotes (") as quote characters. The first row should contain the header with column names. Each input should have its own column. The column containing the reference answer can have any name, but we use "correct_answer" by default.
If you choose a different column name for the reference answer, you'll need to configure the evaluator later with that specific name.
Here's an example of a valid CSV:
text,instruction,correct_answer
Hello,How are you?,I'm good.
"Tell me a joke.",Sure, here's one:...
JSON Format
The test set should be in JSON format with the following structure:
- A JSON file containing an array of objects.
- Each object in the array represents a row, with keys as column headers and values as row data. Here's an example of a valid JSON file:
[
  { "recipe_name": "Chicken Parmesan", "correct_answer": "Chicken" },
  { "recipe_name": "a, special, recipe", "correct_answer": "Beef" }
]
Test set schema for Chat Applications
For chat applications created using the chat template in Agenta, the input should be saved in the column called messages, which would contain the input list of messages:
[
  { "content": "message.", "role": "user" },
  { "content": "message.", "role": "assistant" }
  // Add more messages if necessary
]
In case the prompt include other variables (e.g. context), make sure to have a column with the same name and the value of the variable.
The reference answer column (by default correct_answer) should follow the same format:
{ "content": "message.", "role": "assistant" }
Here is an example of a valid CSV for testing the default chat prompt template:
context,messages,correct_answer
test,"[{""role"":""user"",""content"":""hi""}]","{""content"":""Hello! How can I assist you today?"",""role"":""assistant"",""annotations"":[]}"
Creating a Test Set Using the API
You can upload a test set using our API. Find the API endpoint reference here.
Here's an example of such a call:
HTTP Request:
POST /testsets
Request Body:
{
  "name": "testsetname",
  "csvdata": [
    { "column1": "row1col1", "column2": "row1col2" },
    { "column1": "row2col1", "column2": "row2col2" }
  ]
}
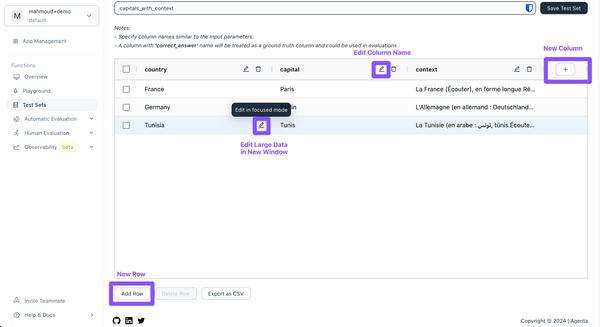
Creating/Editing a Test Set from the UI
To create or edit a test set from the UI:
- Go to
Test sets - Choose
Create a test set with UIor select the test set - Name your test set and specify the columns for input types.
- Add the dataset.
Remember to click Save test set
Creating a Test Set from the Playground
The playground offers a convenient way to create and add data to a test set. This workflow is useful when you discover interesting cases or edge cases while experimenting with your LLM application.
To add a data point to a test set from the playground:
- Work with your application in the playground
- When you find an interesting case, click the
Add to test setbutton located near theRunbutton - A drawer will display showing the inputs and outputs from the playground
- You can modify inputs and correct answers if needed
- Select an existing test set to add to, or choose
+Add newto create a new one - Once you're satisfied, click
Addto finalize
Adding Data From Traces
One of the most valuable sources of test cases is your production data. Traces captured in the Observability view represent real user interactions with your LLM application.
Adding a Single Trace
To add a single trace to a test set:
- Navigate to the Observability view in Agenta
- Find a trace you want to add to a test set
- Click the Add to test set button at the top of the trace
- Choose to create a new test set or select an existing one
- Review the mapping between trace data and test set columns
- Agenta will automatically map the inputs and outputs to appropriate columns
- You can edit the expected answer if you don't agree with the output
- Click Save to add the trace to your test set
Adding Multiple Traces at Once
To efficiently add multiple traces:
- In the Observability view, use the search function to filter traces
- For example, search for specific response patterns like "I don't have enough information"
- Select all relevant traces by checking the boxes next to them
- Click Add to test set
- Choose an existing test set or create a new one
- Review the mapping for the traces
- Click Save to add all selected traces to your test set
Using Your Test Sets
Once you have created test sets, you can use them for:
- Playground Iteration: Load test sets in the playground to test and refine your prompts
- Automated Evaluation: Run systematic evaluations comparing outputs against expected answers
- Human Evaluation: Collect human feedback on your application's performance
- Regression Testing: Ensure new changes don't break existing functionality
To learn more about using your test sets for evaluation, see our Evaluation documentation.